E38 BMW 740i/iL M62 Intake Manifold Removal
Originally posted at http://www.cifesystem.com/bmw740_intake.html
See also: Wynne Huff's PDF version of this document
Warning - I wrote this to help other E38 owners, I assume no responsibility for
any damage, failure, and/or person injury from
following the procedure below.
Do this at your own risk. -Author
E38 BMW 740i/iL M62 Intake Manifold Removal
Photos and Description
Removing Engine Cover and Cylinder Covers
In order to remove the intake manifold, we will need to remove the plastic engine/cylinder cover, unhook the injector electronics, remove the throttle body and the top fuel rail.
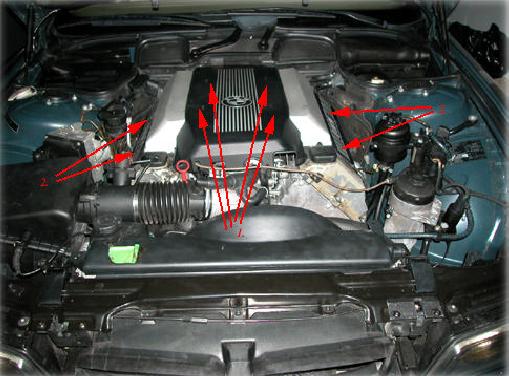
Removing out the engine cover and cylinder covers
Press (1) and take off the engine cover. Open the small plastic covers (2) and unscrew 10mm bolts to take out the cylinder covers. When lifting the
cylinder covers, be careful not to drop the bolt guides.
Removing Air Filter and AMF Housing
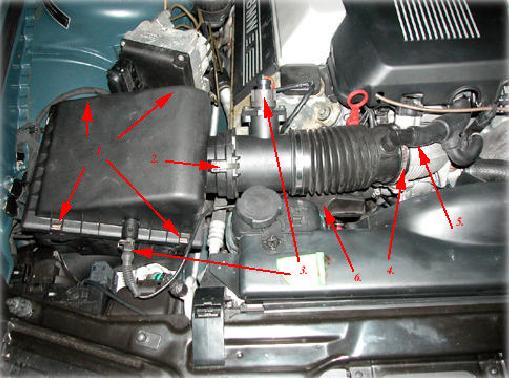
Taking out the air filter housing and AMF (air mass flow) sensor
Unclip (1) and (2). There is another clip in the opposite side of (2). Unclip it as well. Take out the air filter cover. Unclip these sensors (3) (air mass flow sensor
and air temperature sensor) and
untighten the clamp (4). You can pull out the ICV hose (5) and disconnect the AFM. As you take out the AFM, you will see an air
restrictor (it is to reduce noise?) (6), unscrew 10mm bolt to take it out.
Taking out the air filter housing and AMF (air mass flow) sensor
Don't worry about (1), I took out the cover to see what is inside, you don't have to take out the cover to expose these electrical wires.
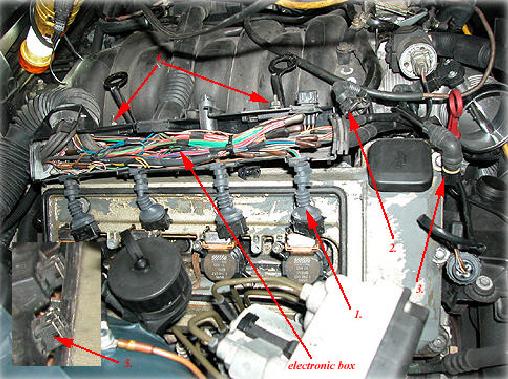
Taking out Ignition Coil Connectors and Others
Pull out all eight of ignition coil connections (1). You will need to pull the metal clip upward and as you pull it upward, take out the connector from the ignition coil. It is tricky, but not too bad.
We need to unclip all the connectors so we can move these electronic boxes out of the way. There is a box on each side of the engine.
Pull out (2) and the knock sensor(3) connector. Loosen (4) 10mm nuts and you got yourself a loose box! Be careful pulling them out yet.
You will need to take out the connectors that hook to the injectors. Take a look at the bottom of the box, you will see 4 injectors hooked up on each side. Uncliping is not easy,
but with a little plier, you can open the thin metal clips and pull out the connectors (5).
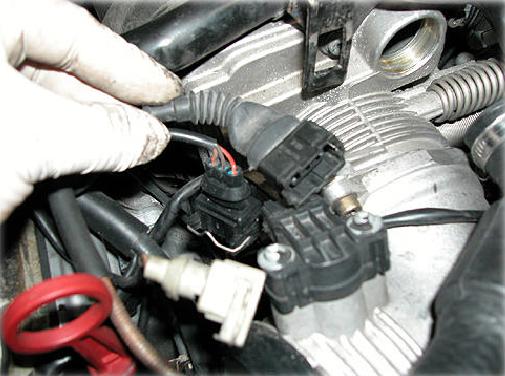
Taking out Ignition Coil Connectors and Others
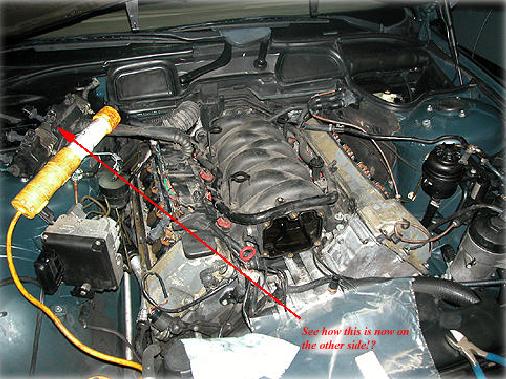
You will have to do the same on the other side, but there is a catch. I didn't know how to unhook the bridge connectors (3), I decided
to cut the wires (1)! Unless you want to spend some time from under the car to unclip some connectors, it is much easier to just
cut them. I will just have to re-wire them later when I put everything back. Hope you have the guts to cut! Once you cut the wires, swing over the electronic box
to the other side. If the throttle cable is in the way, just slip the box under the cable. Then undo (2), which is the battery contact point. I did this to make
more room on top.
Taking out Ignition Coil Connectors and Others
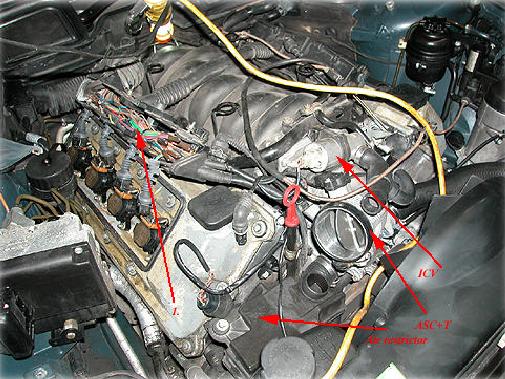
Removing ICV
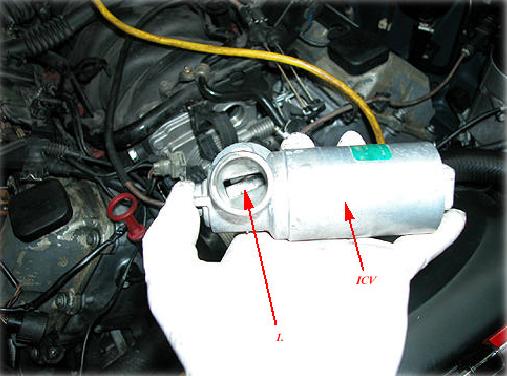
Removing ICV!
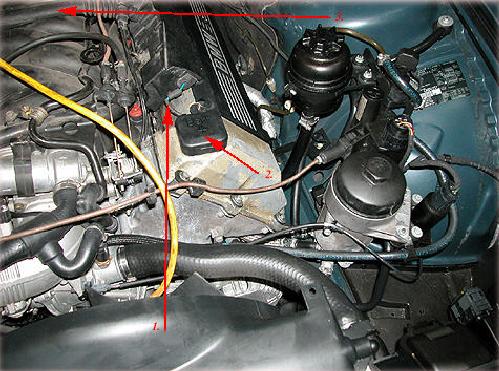
Let's take out the ICV (Idle Control Valve) which is done by unscrewing and unbolting these (1)! Don't forget to undo the white clip. Easy does it! The top nut frees the metal
pipe, just put it out of the way...
Removing ICV!
Look at this shiny metal work! Reminds me of Bender the robot from Futurama show. He used to say "Ah! Bite my shiny metal a$$!". This is a good time to
clean out the ICV, and check if (1) moves freely. Should definitely help your idle condition!
I am not too sure at this point, I may have left couple of hoses which are part of ICV, take them out if that is the case...
Unbolting Throttle Body
Throttle Body Time
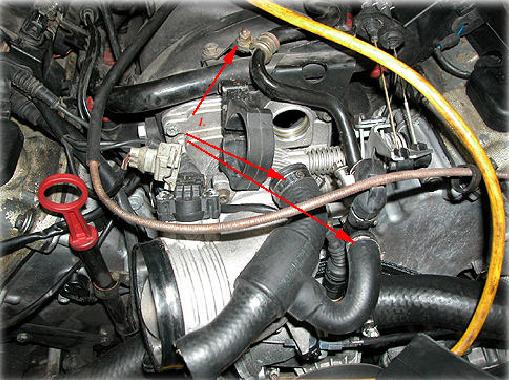
Undo these clips from ASC+T. The white one comes out from ICV from the previous step. Mark them, you will be confused later which goes where!
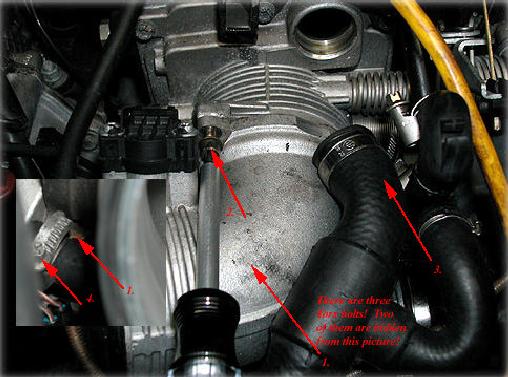
Throttle Body Time
There are three Torx 30 bolts you will need to take out for ASC+T to come off. The (2) and (3) should be easy, but (1)
will be pain. You will have to undo the clip (4) to get to the bolt (1). Be careful not to strip off the
bolts. One way to minimize stripping is to, push the Torx 30 bit hard into the bolt and turn slowly. Good luck because you will need it in the next step!
Throttle Body Time
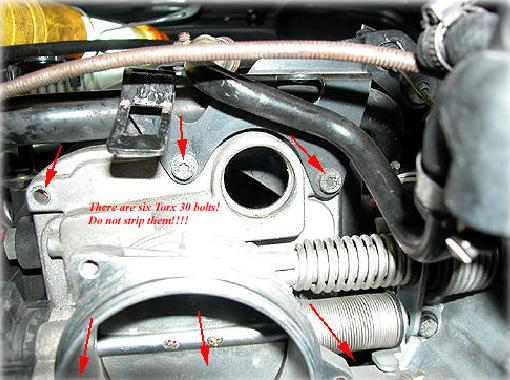
Okay, this might be the hardest step so far (there will be more coming soon). One you take out the three Torx bolts from ASC+T, you can take it off from the throttle body.
Once you put it aside, let us take out the throttle body now. The throttle body is held by six torx bolts and they are even tougher to get to.
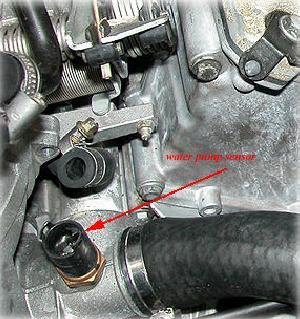
I stripped couple of them, I ended up doing the work "ghetto style", I used a vice grip to turn the bolts out. See the bent ICV mount? It is to make room for my
trusty vice grip! If it helps, you can take out the water pump sensor which sits on top of the water pump right in front of the throttle body. If you don't know what I am talking about,
here is the picture for you. See, I am nice...
The Intake Manifold
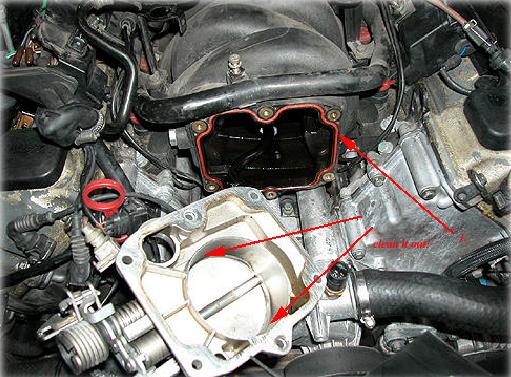
As long as the ASC+T and the throttle body are off, it is a perfect time to clean the gate. Use some sort of intake/throttle body cleaner, clean out all the carbon deposits
and dirts around the center plate.
Lifting the Manifold!
The Intake Manifold
This is a reference photo... You should see what I am seeing right now at this stage... If the gasket (1) looks okay, you should be able to reuse it. I'd
put new one in there just for fun.
The Intake Manifold
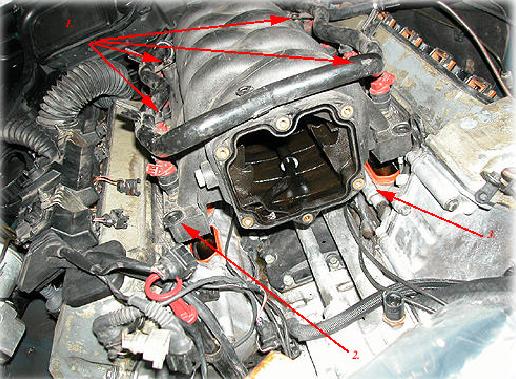
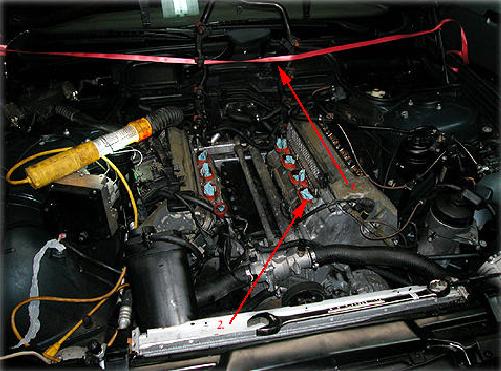
This is somewhat tricky, so do it slow. First, undo these four bolts (1) that holds fuel rail and the engein cover clips. Remember which clip goes where,
they are not identical. Then you should be able to pop the injectors (and fuel rail) from the intake manifold. Pull it hard and you will hear, "pop"!
Take out lots of 10mm bolts (2). Now you are ready to take off the intake manifold. But wait!
Do you see the alum. pipe (3)? Follow this to all the way back. You will see this pipe hooked up to the back of the intake manifold pipe and a metal
clip is covered on top. You will need to undo this clip by pulling it up.
Then from (3), pull the pipe forward. That is, pull it toward to the front of the car.
Finally, there is one hose hooked up to the
back of the manifold, unhook it by pulling it really hard. This one is coming from the driver's side. Now you are ready to lift the intake manifold.
The Intake Manifold
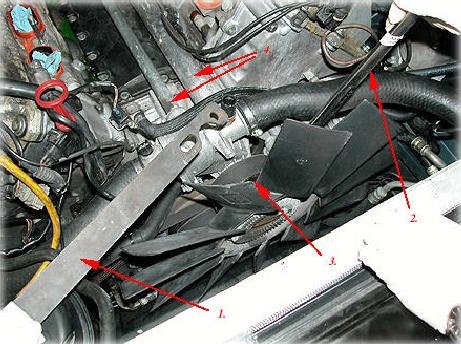
If it helps, you can hang the fuel rail like this (1) for little bit of time. And cover the intake ports(2) from crap falling in there...
I hope this helps for some of you... The $tealers will charge you $$$ to get to this point, now you can do it for free. At this point, you can clean out the intake manifold,
intake valves, the fuel injectors, replace the back plate of intake manifold, and so on! Good luck! For those who need to remove the valley pan gasket,
you will need to remove the water pump and take out the center "cap and seal" part... I will write more about that later. I just wrote this at night, I am just too tired right now...
Taking the Fan Cluch Out!
The Fan Clutch
In order to get to the valley pan, I will have to remove the two metal pipes (4) which are connnecting the water pump and the coolant manifold in the back.
I will start the water pump removal by taking out the fan clutch first.
I took out the top plastic cover that goes over the radiator and the fan in the picture here and also the expansion tank that is also attached to it. There are two
screws at the top ends, just pull out the center bolt and you can take the cover off.
There is a sensor attached to the plastic cover right under the expansion tank. Wiggle it to remove it before taking out the plastic cover.
In addition to the expansion tank, there is an overflow hose that you will need to take out, just take your flat screw driver and loosen the clamp.
Once the cover is out of the way, I used a BMW special tool (1) to hold the main pulley and used a thin 32mm wrench to turn the fan clutch (3).
If you don't have the special tool, you will have to use a thin screw driver or some sort and unbolt two pulley bolts half way to get a good leverage. The fan clutch is
reverse threaded, this means, as you sit in front of the car, you turn the 32mm wrench to the driver side to unscrew it.
A/C and Driver Belts
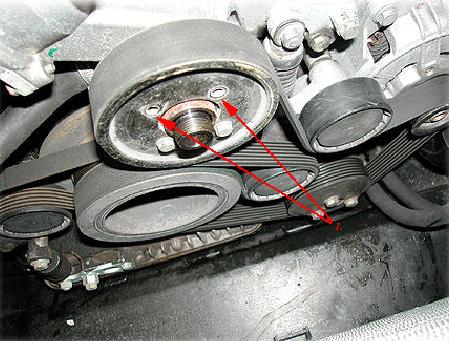
You will eventually have to take out the pullley by unscrewing these bolts (1) to get to water pump. But let's get the belts off first.
A/C and Driver Belts
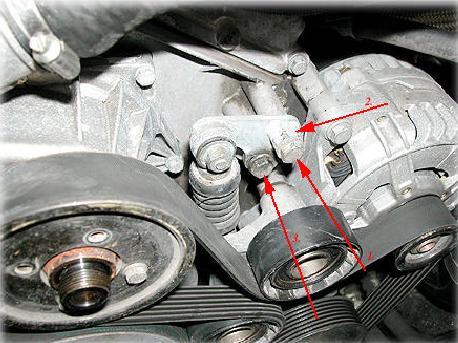
Before taking the belts off, remember how they go around the pulleys so you can reinstall them back correctly! Loosen the belt by unscrewing two tension bolts (3) and (1).
When you are putting back the belt, you can create the tension back by turning the bolt (2) all the way as you tighten (3). And finally, tighten (2) back to secure the
belts.
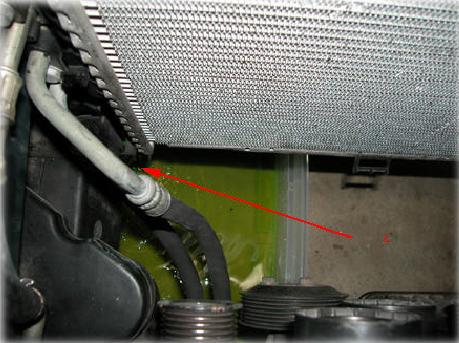
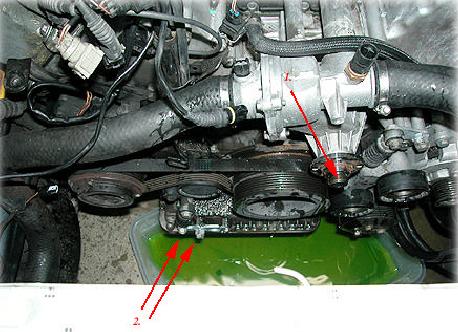
Coolant Drain Plug
Drain the coolant by taking the coolant drain plug off (1). I'd place a big pan under the car to catch all the coolant. If the coolant is fairly new, you can
certainly reuse it.
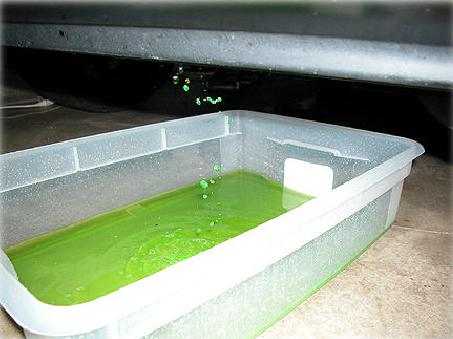
Coolant!
I took this photo. I think it looks cool even though I have nothing to say about this. See how I didn't make any mess?
Ready to Remove Water Pump
It is not necessary to take out the A/C belt for removing the water pump, but if you got this far, I would suggest to replace both A/C and the drive belt with new parts.
They are very cheap and it will give you a peace of mind that these belts will now last lots of miles! Removing the belt is as same as the drive belt (2).
And see how I don't have the pulley (1)?
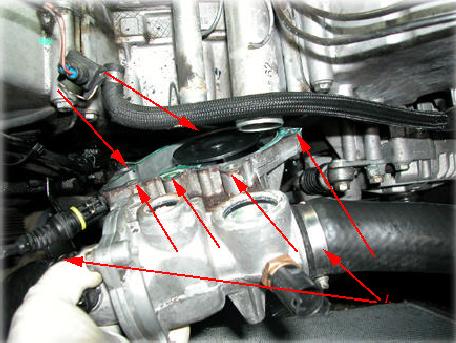
Water Pump
The water pump is held by six bolts, two being the long one. When you take them out one by one, be sure to identify its location. Once all the bolts are out,
you can pull the pump out. If you are replacing the water pump, unclamp these (2). Be sure to scrap all the old gasket off if you are going to reuse the
water pump. And always put new gasket when installing. It should be less than $2 or so in cost...
Getting to the Valley Pan
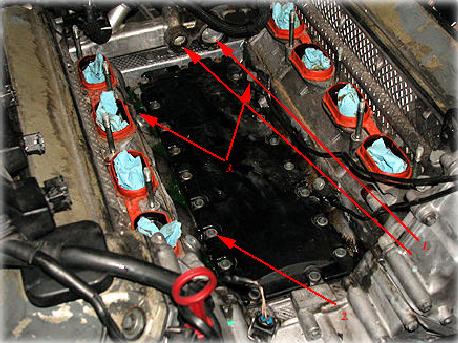
The Valley Pan
Now you should be able to take those two metal pipes out (1). Unbolt all the bolts (2) surrounding the valley pan. Take out the
knock sensors (3) to clear the way. The black plastic cover can be lifted, but it is not easy. You might break one or two clips, but I wouldn't worry about
it too much.
The Valley Pan
Do you see the valley Pan gasket!?
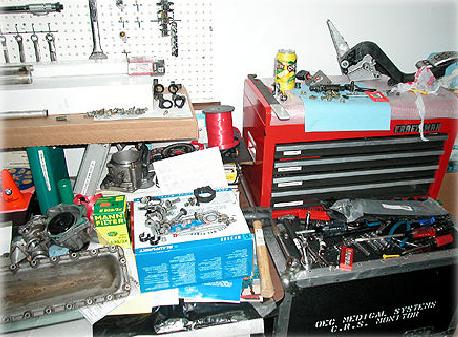
My Work Bench
Definitely not fun...
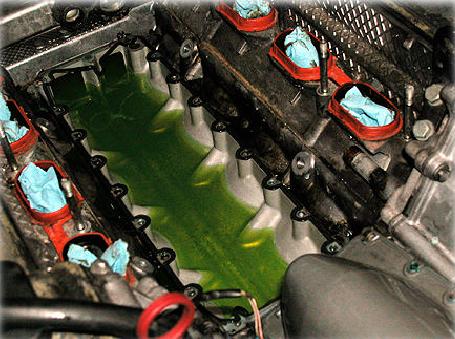
Valley Pan Gasket
Here is the cause of the leak!
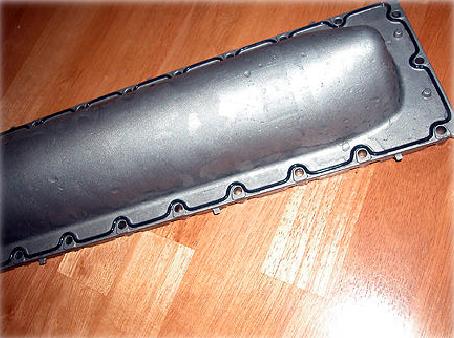
The Intake Manifold
This is the new part. I guess BMW improved on the old part. As you can see the gasket is already attached to the pan from the factory.
At this point, you can replace the valley pan and start putting back the parts in the reverse order. Putting everything back should be fairly easy.
Be careful putting back the intake manifold, be sure to align all the gaskets and also the aluminum pipe that connects the back of the intake manifold and the from
of the engine.
Good luck!
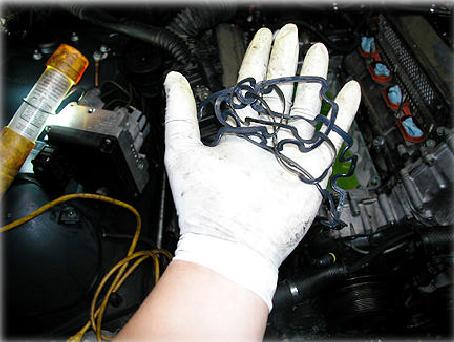
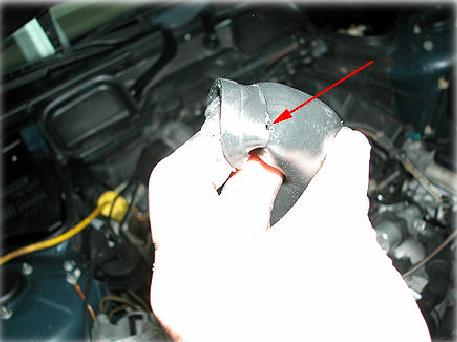
More Coolant Leak??
No!
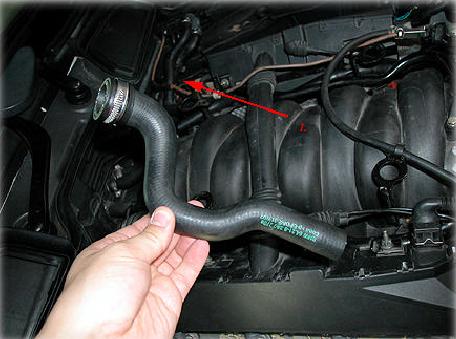
After a couple weeks later, I had another coolant leak, but it was just a ripped rubber hose(1)... This one didn't require the removal of the intake manifold although
I had to work in tight spaces...
No!
At any rate, I ended up spending less than $50 in total parts to fix the coolant leaking problems and I had a chance to clean out all the crap out of the intake system. I hope you will be as lucky(?) as I am...
-SSY
SUPPLEMENTAL INFO FOR INTAKE MANIFOLD GASKET R&R
by Carlton Ollison, 12/2/2005
- Get a ratcheting screwdriver that bends to 90 deg.
- DO NOT remove the throttle body from the intake
until the entire intake is out, only the 90 deg.
coupling, (I spent 40 minutes trying to access the TB
bottom middle bolt - in the end I STRIPPED IT OUT.)
Forcing me to remove it intact with the manifold. That
was cake work. There is no need to remove it until you
get the manifold off.
- Remove the 10 - metal guides from the intake to
give yourself play room before removing the intake.
- Slide the metal tube forward off the rear diaphram
using a flathead at the rear.
- In replacing the tube, slide it onto the cleaned
and lubed front connector as far as possible toward
the radiator.
- With the intake in place, place your right hand at
the rear to guide the tube onto the diaphagm and push
the forward lip with the flathead.
- Be ready to seat the injectors with a rubber hammer
and taps onto the fuel rail
Back to E38.org