I got a metal impeller Geba pump from alloembmwparts.com and this is the same pump sold by bavarian auto. Unfortunately, after two months in the engine, the pump developed a leak and a squeal, so I had to rip it out and replace it with a new dealer part. Lesson: go for the dealer part.
Here is a summary of the main elements of radiator and water pump replacement for a 1998 E38, M62 engine. It is a supplement to the TIS and other e38.org links. I can say that the "replace radiator" description at e38.org, along with the TIS were fairly complete but the following tips will make it even easier. Here are quick list of steps with notes in case you are thinking of doing this on a 1998 (made 11/97). I omit all the obvious steps like remove hoses, connectors, etc.
1. drain coolant. you can do this by draining the bottom of the radiator but there will always be some coolant spillage when you remove the various hoses and pumps
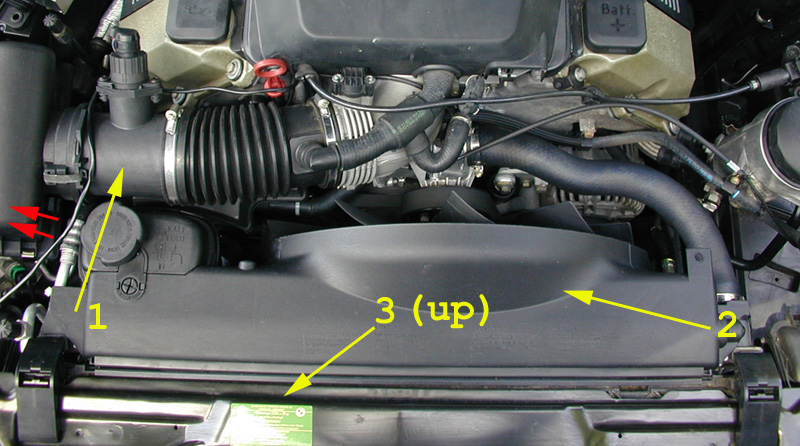
2. remove air cleaner top & flow sensor, then remove air cleaner bottom.
3. remove expansion tank (I just cut the top hose and replaced it)
4. remove fan cowl (two rivets)
5. remove radiator (two big clips) using the technique as follows:
It is unclear how the radiator clips work from the literature. With a flat screwdriver they pop open and unfold towards the rear of the car. The top rotates back almost 90 deg. before release. The TIS never shows them open.
Also it is unclear how to remove the radiator. It turns out it doesn't just "lift straight up" in the 1998. The driver's side rubber mount is captured between its rest stop and some hard tubing. The radiator must be removed by carefully bending the "S" shaped AC tube on the passenger side to move it away from the radiator, lifting the radiator slightly and moving the pass. side of the radiator to the rear of the car. Then work the driver's side mount out by moving towards the pass side about 1 inch. Then it can be removed from the top. Replacement is a pain also and includes getting the side and bottom clips aligned before dropping into place.
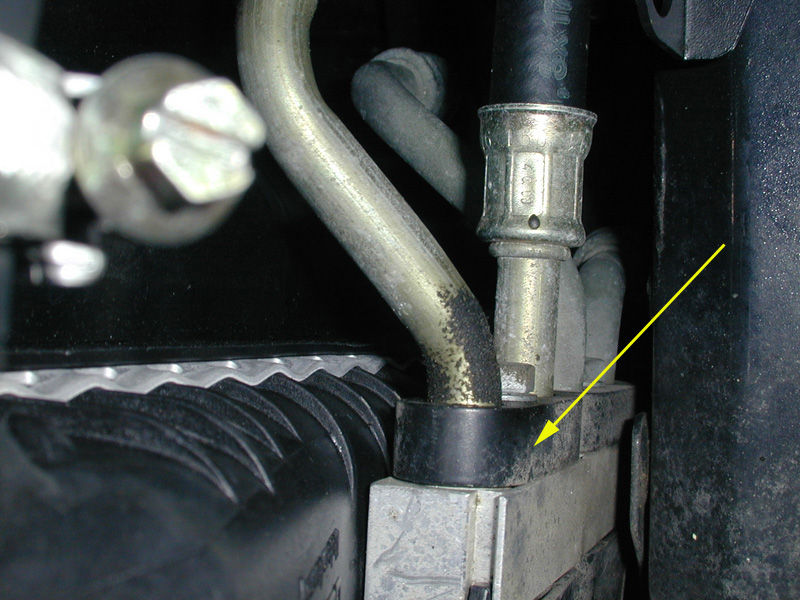
driver's side showing interference to lifting "straight up"

passenger side showing AC line that must gently be bent away from the radiator 1/2" or so
top view showing steps to removal (here the cowl and other items would already be removed)
6. remove fan and clutch (special tools)
7. remove fan belt
It is not ness. to remove the tensioner, just remove the top two bolts and lean to the driver's side to make room for wp removal.
8. remove water pump pulley
it is not necessary to remove vibe damper or AC belt (unlike TIS says)
9. remove water pump bolts and gently pry the wp off and pull it straight back.
Unlike the TIS says, you can remove it and replace it with the thermostat attached.
Finally, keep a big tray under the front of the engine to catch coolant.
One reinstall tip is to affix the top tube to the overflow tank end FIRST, then do the radiator nipple side by lifting the cowl a few inches after the radiator is properly seated.
Will