740i/iL (E38) Recirculation Filter Replacement

740i/iL (E38) Recirculation Filter Replacement |
|
Approx 2 hours (depending on how limber you are)
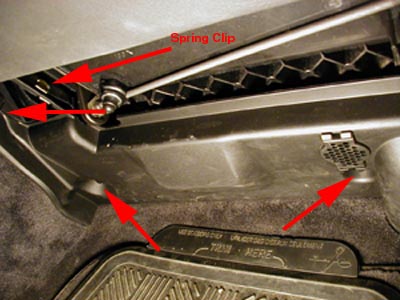
| Remove the 3 fasteners holding the lower plastic cover on.
There should be 1 philips head and 2 push in expandable fasteners, and a
spring clip.
To remove the expandable fasteners, use a small screwdriver or pair of needle nose pliers to pull out the center pin. Once out, using a small screwdriver, gently pry the fastener out of the hole. (on the back side, they look similar to a drywall anchor that expands when the pin is inserted). On the rearmost section of the plate, closest to the center of the car, there is a floor vent with a spring clip holding the plate in place. Use a small screwdriver to gently pry the clip off, allowing the plate to separate from the duct. Once removed, you should be able to begin to work the cover free. The glove box may need to be lowered to free up the plate. You can also remove the car alarm siren from the plate to allow it to be completely removed, and out of your way. |
 |
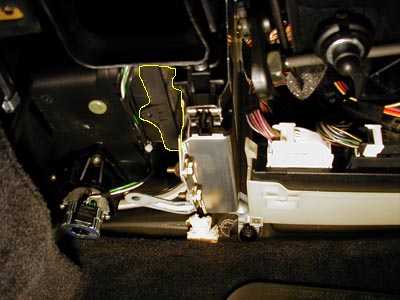
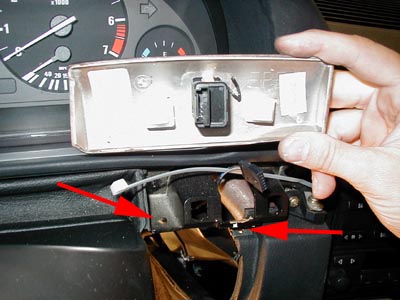
| Once the plate is off, you should be able to look under the
dash and see the recirc filter (outlined in yellow)
Pry the lower clip off, remove the filter, and replace with a new one, or refurbish the old one. Reassemble and you are done with the passenger's side. |
|
This side is the more difficult of the two, however it should not be beyond the talent of your average do it yourselfer.
| Start by removing the plastic lower cover plate. There are 3
philips screws on the rearmost edge, 1 just behind and outboard the brake
petal, and 2 quarter turn locks (nearest the fire wall).
Once removed, look at the parking brake mechanism, while pulling the release handle. You should see the release mechanism moving , and a small coil spring being stretched. Using a screwdriver or pair of pliers, unhook one end of this spring (nearest the rear of the car), and let it hang free. This removes the tension from the brake release cable and handle which will facilitate it's removal later in this procedure. |
 |
| Remove the wood trim pieces on the left and right sides of
the steering wheel.
The tirm pieces are just pressed in using plastic grommets. Gently pry them loose from either end using your fingers. Disconnect the wires to any switches or knobs. (use a ty-wrap to slide between the strands of wire, behind the connector. This will prevent the connector from accidentally disappearing into the dashboard while you are finishing the job.) After the wood trim is removed, remove the 2 Philips head screws from either side that hold the top of the lower dashboard on. |
 |
 |
| The outboard side of the lower dash is held in place by a
sort of pin and groove configuration. It must be flexed slightly outward
to allow the pin to disengage the slot, and allow the lower unit to come
free. Do not attempt to pull the lower cover off
yet!
The parking brake cable must be disconnected before the lower unit will separate from the car. Reach your hand under the dashboard while looking through the separation between the upper and lower dash units, just above the parking brake release. Using your fingers, push the cable coming out of the back of the brake release outboard and up. It should come free of the release handle with little or no effort and allow you to completely remove the lower dashboard cover.
|
 |
| Using the 11mm socket and extension, remove the metal dashboard structural member. It should come completely free when the 3 bolts are removed. |  |
| On the inboard side, just behind of the accelerator petal, there should be a piece of duct work that should be loose. Pry it free with your hands. There is a single spring clip holding it on to the main duct. Be careful during the removal as there is a mechanical damper just behind where the duct attaches to the main. |  |
| You should now be able to see the drivers side recirc
filter. It is just above the accelerator petal, and inboard the steering
column.
Using a screwdriver, pry the lower clip loose, remove the filter, and replace with a new one, or refurbish the old one. With the filter removed, and the duct work removed in the previous step, you should be able to check the operation of the recirculation and the floor vent dampers. Start the car, and put the climate control in recirc mode. You should see the damper behind the recir filter open. Turn off the recirc, and observe the damper close. Perform the same test, using the floor vent on/off button and looking at the damper behind the removed ductwork. Not that you would be able to fix it right now if it did not work, but at least you would know there is a problem. |
 |
NOTE: Many readers have emailed me regarding the disassembly of the lower dash for access to the filter on the drivers side. If you just remove the lower cover plate, and reach up under the dash, you can reach the recirc filter with some contortion and a few four letter words. Knowing exactly where the filter is should allow you to feel around and locate it. I had no idea where the filter was when I started. It seemed quasi logical to start taking stuff apart until I found it. This page is the fruit of that disassembly.
Reverse the procedure to reassemble the drivers side, and enjoy the clean and increased airflow your new filters will give.
If you find any omissions, or anything that is just plain wrong with this procedure, feel free to email me with your suggestions or hints.
Happy motoring